Nginx
使用Nginx流量代理https站点转发
星期五, 八月 18th, 2023 | computer, linux | 没有评论
网上找了一圈,终于找到一个可用的,配置如下:
1 2 3 4 5 6 7 8 9 10 11 12 13 14 15 16 17 18 19 20 21 |
server
      {
        listen       443;
        server_name proxypay.xx.com;

        ssl on;
        ssl_certificate     /etc/nginx/1_proxypay.xx.com_bundle.crt;
        ssl_certificate_key /etc/nginx/2_proxypay.xx.com.key;
        ssl_session_timeout 5m;
        ssl_protocols TLSv1 TLSv1.1 TLSv1.2;
        ssl_ciphers ECDHE-RSA-AES128-GCM-SHA256:HIGH:!aNULL:!MD5:!RC4:!DHE;
        ssl_prefer_server_ciphers on;


        location / {
            proxy_pass https://pay.xx.com/;
            proxy_ssl_certificate     /etc/nginx/1_pay.xx.com_bundle.crt;
            proxy_ssl_certificate_key /etc/nginx/2_pay.xx.com.key;
        }
} |
Nginx解决http host头攻击及Method漏洞
星期一, 十月 10th, 2022 | computer, JAVA-and-J2EE, linux | 没有评论
一、HTTP Host头攻击漏洞解决
检测应用是否在请求目标站点时返回的URL是直接将Host头拼接在URI前。
解决方法:验证host
server { listen 80; server_name 127.0.0.1 192。168.1.8 xxx.com; if ($http_Host !~* ^192.168.1.8|127.0.0.1|xx.com$) { return 403; } } |
二、 HTTP Method非POST和GET方式击漏洞解决
尽量用get和post的api的应用,禁用OPTIONS
解决方案:在nginx的server中配置,只允许GET、POST、PUT、DELETE 类型请求通过,其余不安全的请求方式返回403状态码,代码如下。
if ($request_method !~* GET|POST|PUT|DELETE) { return 403; } |
wordpress版本升级到5.2.3记录
星期日, 九月 8th, 2019 | wordpress | 没有评论
阿里云老是提醒wordpress系统安全问题之类,提醒的烦了就准备升级下,小计.
1.到服务器下载最新版 https://wordpress.org/download/
最新版地址:https://wordpress.org/latest.zip
2.覆盖后升级,发现需要php5.6+,自己的php版本还是5.5+系列
3.折腾,顺便把服务器的centos6.5的也更换到centos7.6,后来发现被坑了一天才完成整改升级计划
4.服务器更新系统很快,安装nginx-1.17.3,mysql5.7,导入数据,
遇到的问题:
4.1:mysql5.7 兼容0000-00-00 00:00:00的日期格式,
4.2:移除wp-seccode插件(不兼容php7.0)
4.3: mysql_connect 更换成 mysqli_connect 等新函数(自己部署的其他应用部分)
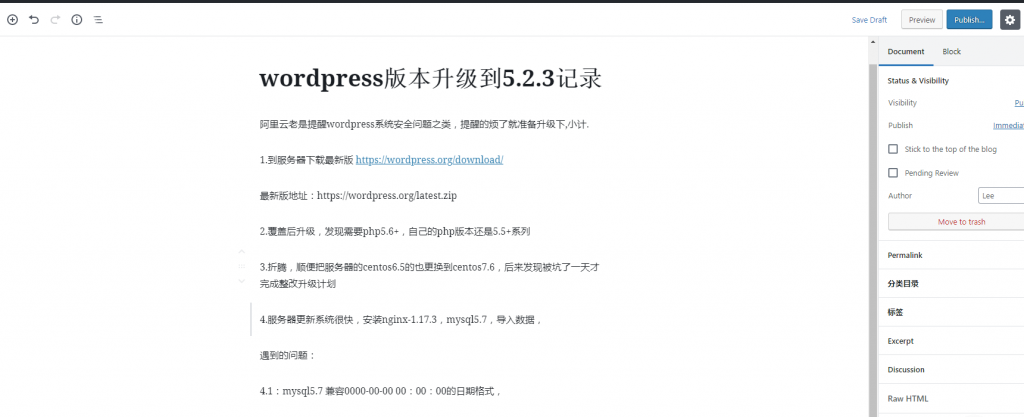
5.总算正常进入及展示了,话说新的后台写文章的界面还真是漂亮
后台写文章界面如下图:

Nginx配置静态文件404问题解决
星期一, 十月 23rd, 2017 | computer, linux | 没有评论
Nginx提供了另外一个静态路径配置 : alias
alias与root区别
官方root
Sets the root directory for requests. For example, with the following configuration location /i/ { root /data/w3; } The /data/w3/i/top.gif file will be sent in response to the “/i/top.gif” request |
官方alias
Defines a replacement for the specified location. For example, with the following configuration location /i/ { alias /data/w3/images/; } on request of “/i/top.gif”, the file /data/w3/images/top.gif will be sent. |
当访问/i/top.gif时,
root是去/data/w3/i/top.gif请求文件,
alias是去/data/w3/images/top.gif请求
root响应的路径:配置的路径+完整访问路径(完整的location配置路径+静态文件)
alias响应的路径:配置路径+静态文件(去除location中配置的路径)
修改配置为
location /api/v1/upload { alias /home/v1/upload/; } |
注意
使用alias时目录名后面一定要加“/”
一般情况下,在location /中配置root,在location /other中配置alias
nginx启用https的注意和妥协支持http2及IE8以下版本http
星期四, 六月 1st, 2017 | JAVA-and-J2EE, linux | 没有评论
站点启用https的支持后,IE8等低版本有一系列的问题(加载http等警告等),妥协是在IE8以下版本重定向到http去,
本文是基于nginx做的处理,支持http2协议,环境centos6.9
一: nginx-1.12.0 指定编译 openssl-1.0.2l.tar.gz及支持http2(openssl起1.0.2版本才支持)
二.重新编译nginx
1.核查版本 #sbin/nginx -V #查看版本 2.下载 #wget http://nginx.org/download/nginx-1.12.0.tar.gz #下载 #tar xzvf nginx-1.12.0.tar.gz #解压缩 #cd nginx-1.12.0 3.编译 ./configure --user=www --group=www --prefix=/usr/local/webserver/nginx --with-http_stub_status_module --with-openssl=/usr/local/webserver/openssl --with-http_ssl_module --with-pcre=/ia/data/tgz/pcre-8.32 --with-http_realip_module --with-http_image_filter_module --with-http_v2_module #make #mv /usr/local/webserver/nginx/sbin/nginx /usr/local/webserver/nginx/sbin/nginx.old #移动旧版本 #cp objs/nginx /usr/local/webserver/nginx/sbin/ #复制新版本nginx过去 4.启动新的,关掉旧的 让nginx把nginx.pid改成nginx.pid.oldbin 跟着启动新的nginx # kill -USR2 `cat /usr/local/webserver/nginx/nginx.pid` 退出旧的nignx # kill -QUIT `cat /usr/local/webserver/nginx/nginx.pid.oldbin 5.升级完成。 # sbin/nginx -V |
三:(443端口)配置IE8以下版本重定向,(80端口)其他版本支持https
if ($http_user_agent !~* "MSIE [5-8].[0-9]") { rewrite (.*) https://www.iatodo.com$1 permanent; break; } if ($http_user_agent ~* "MSIE [5-8].[0-9]") { rewrite (.*) http://www.iatodo.com$1 permanent; break; } |
使用certbot来进行Let’s Encrypt的ssl 配置
星期四, 五月 18th, 2017 | JAVA-and-J2EE, linux | 一条评论
之前let’s encrypt 的老版本可以参考这篇文章主要配置也都相同
//www.pomelolee.com/1562.html
基于nginx配置
安装方法
如果是CentOS 6,先执行:yum install epel-release
cd /root/
wget https://dl.eff.org/certbot-auto –no-check-certificate
chmod +x ./certbot-auto
./certbot-auto -n
接下来就会自动安装所需的依赖包。
配置nginx
1 2 3 4 5 6 7 8 | location ^~ /.well-known/acme-challenge/ { default_type "text/plain"; root /usr/share/nginx/html; } location = /.well-known/acme-challenge/ { return 404; } |
生成证书
单域名生成证书:
1 | ./certbot-auto certonly --email username@domain --agree-tos --webroot -w /websiteroot -d domain |
多域名单目录生成单证书:
1 | ./certbot-auto certonly --email username@domain --agree-tos --webroot -w /websiteroot -d domain1 -d domain2 |
多域名多目录生成多个证书:
1 | ./certbot-auto certonly --email admin@vpser.net --agree-tos --webroot -w /websiteroot1 -d domain1 -d domain2 -w /websiteroot2 -d domain3 -d domain4 |
证书更新
› Continue reading
nginx和php隐藏版本号信息
星期四, 十二月 29th, 2016 | php | 没有评论
nginx 隐藏版本号 配置nginx.cnf server_tokens off; 即可
1 2 3 4 | http { # ...省略一些配置 server_tokens off; } |
2.php 的版本信息 会在 HTTP头,以类似X-Powered-By: PHP/7.0.14 这种形式
在php.ini 中关闭 expose_php = Off 即可
1 2 3 4 5 6 7 8 9 10 | ;;;;;;;;;;;;;;;;; ; Miscellaneous ; ;;;;;;;;;;;;;;;;; ; Decides whether PHP may expose the fact that it is installed on the server ; (e.g. by adding its signature to the Web server header). It is no security ; threat in any way, but it makes it possible to determine whether you use PHP ; on your server or not. ; http://php.net/expose-php expose_php = On |
对应改为记得重启下php 和对应的nginx
nginx支持lua的编译配置及Nginx rewrite对post数据的影响
星期四, 十二月 8th, 2016 | JAVA-and-J2EE, linux | 没有评论
nginx+lua 可以很方便做限流,路由等其他配置很是方便
编译配置如下:
lua-nginx-module 是 openresty(集成nginx版本) 下的一个模块可以独立编译挂载
https://github.com/openresty/lua-nginx-module
Alternatively, ngx_lua can be manually compiled into Nginx:
1.Install LuaJIT 2.0 or 2.1 (recommended) or Lua 5.1 (Lua 5.2 is not supported yet). LuaJIT can be downloaded from the LuaJIT project website and Lua 5.1, from the Lua project website. Some distribution package managers also distribute LuaJIT and/or Lua.
2.Download the latest version of the ngx_devel_kit (NDK) module HERE.
3.Download the latest version of ngx_lua HERE.
4.Download the latest version of Nginx HERE (See Nginx Compatibility)
下载编译安装:
› Continue reading
nginx配置https使其达到A+水平
星期六, 五月 21st, 2016 | linux | 一条评论
前面有一篇文章配置了启用https的安全连接基于LetsEncrypt SSL的nginx配置
在 SSL的安全检测中才获得了B,想达到A+,也很轻松,加下配置文件即可,测试地址:https://www.ssllabs.com/ssltest/index.html
配置如下(nginx.conf):
1 2 3 4 5 6 7 8 9 10 11 12 13 14 15 16 17 18 19 | server { listen 192.168.1.1:443 ssl; listen 192.168.1.1:80; server_name www.iatodo.com iatodo.com; add_header Strict-Transport-Security "max-age=31536000; includeSubDomains; preload"; ssl_certificate /etc/letsencrypt/live/iatodo.com/fullchain.pem; ssl_certificate_key /etc/letsencrypt/live/iatodo.com/privkey.pem; ssl_ciphers EECDH+CHACHA20:EECDH+CHACHA20-draft:EECDH+AES128:RSA+AES128:EECDH+AES256:RSA+AES256:EECDH+3DES:RSA+3DES:!MD5; ssl_prefer_server_ciphers on; ssl_protocols TLSv1 TLSv1.1 TLSv1.2; ssl_session_cache shared:SSL:50m; ssl_session_timeout 1d; ssl_session_tickets on; ...... |
启用https的安全连接基于LetsEncrypt SSL的nginx配置
星期四, 五月 5th, 2016 | JAVA-and-J2EE, linux | 2 Comments
现在网站不是https都不好意思和别人说了,顺便也跟下潮流.
操作系统:Centos6.5版本
官方文档参考: let’s encrypt getting started
具体介绍就不废话了,知道是免费、时效是90天即可,记得及时自动续期就好.
一.系统环境配置
Git
1 | yum -y install git |
python 2.7 检查
1 | /usr/bin/python -V #查看版本 |
安装编译需要的工具
1 | yum install zlib-devel bzip2-devel openssl-devel xz-libs wget xz |
安装 Python2.7.8
› Continue reading
Search
相关文章
热门文章
最新文章
文章分类
- ajax (10)
- algorithm-learn (3)
- Android (6)
- as (3)
- computer (86)
- Database (30)
- disucz (4)
- enterprise (1)
- erlang (2)
- flash (5)
- golang (3)
- html5 (18)
- ios (4)
- JAVA-and-J2EE (186)
- linux (144)
- mac (10)
- movie-music (11)
- pagemaker (36)
- php (50)
- spring-boot (2)
- Synology群晖 (2)
- Uncategorized (6)
- unity (1)
- webgame (15)
- wordpress (33)
- work-other (2)
- 低代码 (1)
- 体味生活 (40)
- 前端 (21)
- 大数据 (8)
- 游戏开发 (9)
- 爱上海 (19)
- 读书 (4)
- 软件 (3)

