JAVA-and-J2EE
Spring Boot 的核心注解SpringBootApplication引起的探究
星期二, 十二月 3rd, 2019 | JAVA-and-J2EE, spring-boot | 没有评论
Spring Boot 的核心注解SpringBootApplication引起的探究
1.Spring Boot 的核心注解是哪个?
先上一个工程的启动配置项看下:
项目比较老混杂了spring boot,dubbo,jersey注册等
package com.pomelolee.cms; import com.ctrip.framework.apollo.spring.annotation.EnableApolloConfig; import com.pomelolee.boot.dubbo.annotation.EnableDubboProvider; import org.glassfish.jersey.server.ResourceConfig; import org.glassfish.jersey.servlet.ServletProperties; import org.springframework.beans.factory.config.BeanDefinition; import org.springframework.boot.SpringApplication; import org.springframework.boot.autoconfigure.SpringBootApplication; import org.springframework.boot.builder.SpringApplicationBuilder; import org.springframework.boot.web.support.SpringBootServletInitializer; import org.springframework.cloud.client.discovery.EnableDiscoveryClient; import org.springframework.cloud.netflix.feign.EnableFeignClients; import org.springframework.context.annotation.Bean; import org.springframework.context.annotation.ClassPathScanningCandidateComponentProvider; import org.springframework.context.annotation.ImportResource; import org.springframework.util.ClassUtils; import java.util.HashSet; import java.util.Set; @EnableFeignClients @SpringBootApplication @EnableApolloConfig @EnableDiscoveryClient @EnableDubboProvider @ImportResource("classpath*:/META-INF/spring/spring-job.xml") public class Application extends SpringBootServletInitializer { public static void main(String[] args) { SpringApplication.run(Application.class, args); } @Override protected SpringApplicationBuilder configure(SpringApplicationBuilder application) { return application.sources(Application.class); } @Bean public ResourceConfig resourceConfig() { ResourceConfig resourceConfig = new ResourceConfig(); ClassPathScanningCandidateComponentProvider scanner = new ClassPathScanningCandidateComponentProvider(true); Set<beandefinition> beanDefinitionSet = scanner.findCandidateComponents("com.pomelolee.cms.service"); beanDefinitionSet.addAll(scanner.findCandidateComponents("com.pomelolee.cms.facade")); beanDefinitionSet.addAll(scanner.findCandidateComponents("com.pomelolee.cms.config")); Set<Class<?>> clazzSet = new HashSet<Class<?>>(); for (BeanDefinition beanDefinition : beanDefinitionSet) { clazzSet.add( ClassUtils.resolveClassName( beanDefinition.getBeanClassName(), resourceConfig.getClassLoader())); } resourceConfig.registerClasses(clazzSet); resourceConfig.property(ServletProperties.FILTER_FORWARD_ON_404, true); return resourceConfig; } } </beandefinition> |
@SpringBootApplication 注解,就是 Spring Boot 的核心注解。
centos下jdk11及jdk8的环境变量配置
星期三, 十一月 20th, 2019 | JAVA-and-J2EE, linux | 一条评论
0.最新的下载地址
Oracle 官方下载地址:https://www.oracle.com/technetwork/java/javase/downloads/index.html
国内镜像仓库华为:https://repo.huaweicloud.com/java/jdk/
由于Oracle JDK 11 的许可证的变化,生产环境需要使用OpenJDK 11(以免甲骨文律师信警告^o^)
亚马逊的编译版本下载地址(corretto):https://aws.amazon.com/cn/corretto/
adoptopenjdk编译的版本下载:https://adoptopenjdk.net/
1.配置jdk11、jdk12的 /etc/profile文件最后面追加即可,
jdk9后续版本将不再有jre及classpath要配置了
vi /etc/profile export JAVA_HOME=/usr/local/webserver/jdk/jdk-11.0.5 export PATH=$PATH:$JAVA_HOME/bin |
后续source 生效
source /etc/profile java -version |
2.配置jdk8的配置文件
tar zxvf jdk-8u231-linux-x64.tar.gz mv jdk1.8.0_231 /usr/local/java/ vi /etc/profile export JAVA_HOME=/usr/local/java/jdk1.8.0_231 export JRE_HOME=/usr/local/java/jdk1.8.0_231/jre export CLASSPATH=.:$CLASSPATH:$JAVA_HOME/lib:$JRE_HOME/lib export PATH=$PATH:$JAVA_HOME/bin:$JRE_HOME/bin |
使用shell脚本批量发送curl的POST数据请求
星期五, 十月 18th, 2019 | JAVA-and-J2EE, linux | 没有评论
里面写了sleep睡眠,可以移除
写定循环传递参数等,用于自动处理数据比较方便,记录如下,可以根据自己的情况进行调整.
shell脚本如下
#!/bin/bash function curlRequest() { echo ">>>>>>>>>>>>>>"$1 info=`curl -s -H "Accept: application/json" -H "Content-type: application/json" -X POST -d "{\"id\":$1,\"processState\":3}" "https://www.pomelolee.com/info" ` echo "<<<<<<<<<<<<<<"$info #info=`curl -s -m 10 --connect-timeout 10 -I $1` #code=`echo $info|grep "HTTP"|awk '{print $2}'` #if [ "$code" == "200" ];then # echo "request succeed,ret code is $code" #else # echo "request fail,ret code is $code" #fi } ids=(29 100 13 8 91 44) for id in ${ids[@]} do curlRequest $id echo $id sleep 2s done |
vertx初体验之使用vertx3.8.2压缩运行内存及发布包大小
星期四, 十月 17th, 2019 | JAVA-and-J2EE | 没有评论
当前vertx版本3.8.2
0.起因,做了一个简单的数据监控收集,要求嘛 当然是快速返回,异步处理收集的数据
用spring boot 是很快做了出来,打包后35M,部署到机器上运行内存占用175M,实际上也不多,奈何我的机器才1C1G,又装了mysql等
1.使用vertx实现功能,降低内存运行时(60M),发布包大小7M
2.可以到 https://start.vertx.io/ 自动创建一个应用很方便
更多官方的示例见 vertx-examples
3.直接main启动应用
public class MainLauncher extends Launcher { public static void main(String[] args) { new MainLauncher().dispatch(new String[] { "run", MainVerticle.class.getName() }); // startVertx(); } public static void startVertx() { try { Vertx.vertx() .deployVerticle(new MainVerticle(), new DeploymentOptions().setConfig(new JsonObject(new String(Files.readAllBytes(Paths.get( "conf/conf.json")))))); } catch (Exception e) { e.printStackTrace(); } } } |
4.主程序如下
@Override public void start(Promise<Void> startPromise) throws Exception { JsonObject jo = config(); Router router = Router.router(vertx); router.get("/").handler(this::indexHandler); vertx.createHttpServer().requestHandler(router).listen(jo.getInteger("http.port", 8080), http -> { if (http.succeeded()) { startPromise.complete(); } else { startPromise.fail(http.cause()); } }); //aiService = new AiServiceImpl(vertx, jo); //aiService.loadDataCache(); } private void indexHandler(RoutingContext context) { context.response().putHeader("Content-Type", "text/html"); context.response().end("Hello vip."); } |
5.打包完成后启动脚本
java -jar AI-1.0.0-fat.jar -conf /config/AI/conf.json & |
Apache、Nginx下Font Awesome等woff的文件得显示问题
星期三, 八月 7th, 2019 | html5, JAVA-and-J2EE | 没有评论
1.Apache 下配置新增
ddType application/font-sfnt otf ttf AddType application/font-woff woff AddType application/font-woff2 woff2 AddType application/vnd.ms-fontobject eot <FilesMatch "\.(ttf|otf|eot|woff|woff2)$"> <IfModule mod_headers.c> Header set Access-Control-Allow-Origin "*" </IfModule> </FilesMatch> |
2.nginx 配置新增
location ~* \.(eot|otf|ttf|woff|woff2|svg)$ { root /data/www; add_header Access-Control-Allow-Origin *; } |
解决:mysql5.7 timestamp默认值‘0000-00-00 00:00:00’报错及Ubuntu Server下启动/停止/重启MySQL
星期六, 七月 27th, 2019 | JAVA-and-J2EE, linux | 没有评论
解决:mysql5.7 timestamp默认值‘0000-00-00 00:00:00’报错及Ubuntu Server下启动/停止/重启MySQL
1.Ubuntu Server下启动/停止/重启MySQL
启动mysql: 方式一:sudo /etc/init.d/mysql start 方式二:sudo service mysql start 停止mysql: 方式一:sudo /etc/init.d/mysql stop 方式二:sudo service mysql stop 重启mysql: 方式一:sudo/etc/init.d/mysql restart 方式二:sudo service mysql restart |
2. ‘0000-00-00 00:00:00’报错的解决
使用 SELECT @@sql_mode; 查询当前的sql模式
更改模式版本 在my.cnf[mysqld]下添加 重启服务即可
sql-mode=ONLY_FULL_GROUP_BY,STRICT_TRANS_TABLES,ERROR_FOR_DIVISION_BY_ZERO,NO_AUTO_CREATE_USER,NO_ENGINE_SUBSTITUTION |
springmvc postHandle拦截器中ModelAndView为null
星期一, 七月 1st, 2019 | JAVA-and-J2EE | 没有评论
常常使用spring mvc 的postHandle 拦截器做些内容
但是要注意的是:如果使用了RestController则意味着返回了 ResponseBody,将不再有ModelAndView
此刻如果不做任何处理的话,会看到一堆重复out输出的异常,即重复输出。
解决之法,当然是判断 ModelAndView 为null时,不再做处理 即可.
springboot 使用druid连接池及使用原JDBCTemplate配置
星期日, 六月 30th, 2019 | Database, JAVA-and-J2EE | 没有评论
0.springboot 版本说明2.1.4.RELEASE
1.起因是部门架构部说druid在高并发下和以前的框架集成包有冲突
会造成连接池无法缓存,连接数暴涨,达到最大连接数,从而造成服务异常
2.我没有实际测试,也不好直接下结论,姑且把常用的spring boot 集成的druid配置如下:
<dependency> <groupid>org.springframework</groupid> <artifactid>spring-jdbc</artifactid> </dependency> <dependency> <groupid>com.alibaba</groupid> <artifactid>druid-spring-boot-starter</artifactid> <version>1.1.10</version> </dependency> |
docker 下mysql时区8个小时的解决办法及JDBC连接数据库mysql serverTimezone useSSL时差
星期四, 六月 20th, 2019 | JAVA-and-J2EE, linux | 没有评论
问题起因:
1.应用启动初始化数据看了下插入的数据时间和本地时间不一致 差了8个小时
解决方法:
网上检索之发现最终引起的原因是新版JDBC驱动指定的serverTimezone的原因
1.修正docker下mysql时区的问题
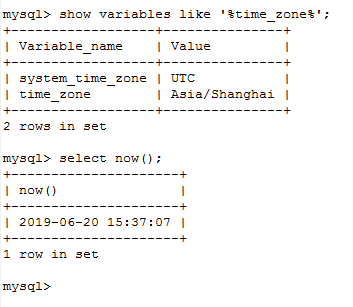
show variables like '%time_zone%'; set global time_zone='Asia/Shanghai'; set time_zone='Asia/Shanghai'; flush privileges; |
实际上这么操作后,如果无法生效的话,还是要修改配置文件并重新启动mysql使其生效
docker下的路径在 /etc/mysql/conf.d/my.cnf
修改my.cnf default-time-zone ='Asia/Shanghai' |
查看 select now(); 等 如下图
2.因使用的新版的驱动需要调整的部分
随机数生成的工具类–Apache Commons–RandomStringUtils
星期六, 六月 15th, 2019 | JAVA-and-J2EE | 没有评论
常用的随机数生成
使用 Commons Lang 项目地址:http://commons.apache.org/proper/commons-lang/
当前POM最新引用:
<dependency> <groupId>org.apache.commons</groupId> <artifactId>commons-lang3</artifactId> <version>3.9</version> </dependency> |
常用使用示例:
1.RandomStringUtils.random(4)
:产生4位长度的随机字符串,中文环境下是乱码
2.RandomStringUtils.random(4, new char[]{‘a’,’b’,’c’,’d’,’e’,’f’, ‘1’, ‘2’, ‘3’})
:使用指定的字符生成4位长度的随机字符串
3.RandomStringUtils.randomAlphabetic(4)
:生成指定长度的随机大小写字母组合的字符串
4.RandomStringUtils.randomAlphanumeric(4)
:生成指定长度的字母数字组合的字符串
4.RandomStringUtils.randomNumeric(4)
:生成随机数字字符串
6.RandomStringUtils.randomAscii(4)
:生成从ASCII 32到126组成的随机字符串 (包括符号)

Search
相关文章
热门文章
最新文章
文章分类
- ajax (10)
- algorithm-learn (3)
- Android (6)
- as (3)
- computer (86)
- Database (30)
- disucz (4)
- enterprise (1)
- erlang (2)
- flash (5)
- golang (3)
- html5 (18)
- ios (4)
- JAVA-and-J2EE (186)
- linux (144)
- mac (10)
- movie-music (11)
- pagemaker (36)
- php (50)
- spring-boot (2)
- Synology群晖 (2)
- Uncategorized (6)
- unity (1)
- webgame (15)
- wordpress (33)
- work-other (2)
- 低代码 (1)
- 体味生活 (40)
- 前端 (21)
- 大数据 (8)
- 游戏开发 (9)
- 爱上海 (19)
- 读书 (4)
- 软件 (3)